selamat datang

acon free

Get Free Premium Account Rapidshare Megaupload Hotfile

free download firmware lenkap

bisnis paling gratis

informasi berhadiah

iNeedSell.com: Free online ads. Post your Ad here.

Kamis, 31 Mei 2012

Mobile Repair

Mobile Repair


Nokia C3-01 Lighting Problem Repairing solution

Posted: 30 May 2012 11:35 PM PDT

This solution covers for hardware level of repair for Nokia C3-01 with a Lighting problem and Also you will find Nokia C3-01 Lighting Ways and Jumpers information in the diagrams further in this article.

Just see the solution preview below for it shows which components needs to be check and replace if the said Lighting of the Nokia C3-01 goes wrong.
This solution may help if you already done a software calibration method and tried replacing the Display or Display Connector but the problem continues.

Do these solutions step by step.

This solution may help for a water or wet damaged and accidentally, heavily dropped phones.
The Problem occur because of faulty TouchScreen Connector or bad it's connection to the Mobile Phone's PCBA Motherboard.
You Can Use any cleaning liquid for this purpose like CTC or any other you prefer.

Here is a list of all the solutions for the mentioned problems or faults available at the moment.

Nokia C3-01 Lighting Problem
Nokia C3-01 Lighting Ways
Nokia C3-01 Lighting Jumpers
Nokia C3-01 Lighting Solution

Please Note that we will edit these solutions or add new ones if found in this page at any time in the future.
So feel free to come back any time on this page to stay up to date.

Nokia C3-01 Lighting Problem Repair solution

Nokia C3-01 Lighting Problem Repair solution

If you have further Questions please leave a comment.

Note: Please note that even though every solution posted on out website is tested by one or more members of our team before posting, but still we do not take any responsibility for any damage it may cause to your cell phones. Use these repairing solutions at your own risk. Thank You

Nokia C3-01 Display Problem Repairing solution

Posted: 30 May 2012 11:30 PM PDT

This solution covers for hardware level of repair for Nokia C3-01 with a Display problem and Also you will find Nokia C3-01 Display Ways and Jumpers information in the diagrams further in this article.

Just see the solution preview below for it shows which components needs to be check and replace if the said Display of the Nokia C3-01 goes wrong.
This solution may help if you already done a software calibration method and tried replacing the Display or Display Connector but the problem continues.

Do these solutions step by step.

This solution may help for a water or wet damaged and accidentally, heavily dropped phones.
The Problem occur because of faulty TouchScreen Connector or bad it's connection to the Mobile Phone's PCBA Motherboard.
You Can Use any cleaning liquid for this purpose like CTC or any other you prefer.

Here is a list of all the solutions for the mentioned problems or faults available at the moment.

Nokia C3-01 Display Problem
Nokia C3-01 Display Ways
Nokia C3-01 Display Jumpers
Nokia C3-01 Display Solution

Please Note that we will edit these solutions or add new ones if found in this page at any time in the future.
So feel free to come back any time on this page to stay up to date.

Nokia C3-01 Display Problem Repair solution

Nokia C3-01 Display Problem Repair solution

If you have further Questions please leave a comment.

Note: Please note that even though every solution posted on out website is tested by one or more members of our team before posting, but still we do not take any responsibility for any damage it may cause to your cell phones. Use these repairing solutions at your own risk. Thank You

Nokia C3-01 Ringer Problem Repair solution

Posted: 30 May 2012 11:27 PM PDT

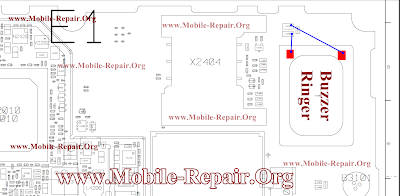
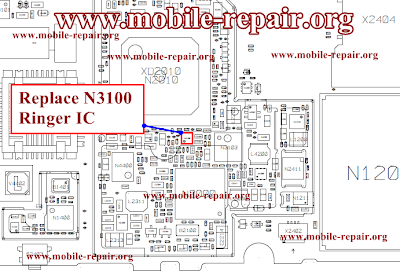
This solution covers for hardware level of repair for Nokia C3-01 with a Ringer problem and Also you will find Nokia C3-01 Ringer Ways and Jumpers information in the diagrams further in this article.

Just see the solution preview below for it shows which components needs to be check and replace if the said Ringer of the Nokia C3-01 goes wrong.
This solution may help if you already done a software calibration method and tried replacing the Ringer or Buzzer but the problem continues.

Do these solutions step by step.

This solution may help for a water or wet damaged and accidentally, heavily dropped phones.
The Problem occur because of faulty TouchScreen Connector or bad it's connection to the Mobile Phone's PCBA Motherboard.
You Can Use any cleaning liquid for this purpose like CTC or any other you prefer.

Here is a list of all the solutions for the mentioned problems or faults available at the moment.

Nokia C3-01 Ringer Problem
Nokia C3-01 Ringer Ways
Nokia C3-01 Ringer Jumpers
Nokia C3-01 Ringer Solution

Please Note that we will edit these solutions or add new ones if found in this page at any time in the future.
So feel free to come back any time on this page to stay up to date.

Nokia C3-01 Ringer Problem Repair solution

Nokia C3-01 Ringer Problem Repair solution

If you have further Questions please leave a comment.

Note: Please note that even though every solution posted on out website is tested by one or more members of our team before posting, but still we do not take any responsibility for any damage it may cause to your cell phones. Use these repairing solutions at your own risk. Thank You

Nokia C3-01 Handsfree Problem Repair solution

Posted: 30 May 2012 11:17 PM PDT

This solution covers for hardware level of repair for Nokia C3-01 with a Handsfree  problem and Also you will find Nokia C3-01 Handsfree Ways and Jumpers information in the diagrams further in this article.

Just see the solution preview below for it shows which components needs to be check and replace if the said Handsfree of the Nokia C3-01 goes wrong.
This solution may help if you already done a software calibration method and tried replacing the Handsfree or Handsfree Connector but the problem continues.

Do these solutions step by step.

This solution may help for a water or wet damaged and accidentally, heavily dropped phones.
The Problem occur because of faulty TouchScreen Connector or bad it's connection to the Mobile Phone's PCBA Motherboard.
You Can Use any cleaning liquid for this purpose like CTC or any other you prefer.

Here is a list of all the solutions for the mentioned problems or faults available at the moment.

Nokia C3-01 Handsfree Problem
Nokia C3-01 Handsfree Ways
Nokia C3-01 Handsfree Jumpers
Nokia C3-01 Handsfree Solution

Please Note that we will edit these solutions or add new ones if found in this page at any time in the future.
So feel free to come back any time on this page to stay up to date.

Nokia C3-01 Handsfree Problem Repair solution

Nokia C3-01 Handsfree Problem Repair solution

If you have further Questions please leave a comment.

Note: Please note that even though every solution posted on out website is tested by one or more members of our team before posting, but still we do not take any responsibility for any damage it may cause to your cell phones. Use these repairing solutions at your own risk. Thank You

Sabtu, 26 Mei 2012

Mobile Repair

Mobile Repair


Nokia C3-01 Mic Problem Repair solution

Posted: 26 May 2012 07:20 AM PDT

This solution covers for hardware level of repair for Nokia C3-01 with a Mic problem and Also you will find Nokia Nokia C3-01 Mic Ways and Jumpers information in the diagrams further in this article.

Just see the solution preview below for it shows which components needs to be check and replace if the said Mic of the Nokia C3-01 goes wrong.
This solution may help if you already done a software calibration method and tried replacing the Touch Screen but the problem continues.

Do these solutions step by step.

This solution may help for a water or wet damaged and accidentally, heavily dropped phones.
The Problem occur because of faulty TouchScreen Connector or bad it's connection to the Mobile Phone's PCBA Motherboard.
You Can Use any cleaning liquid for this purpose like CTC or any other you prefer.

Here is a list of all the solutions for the mentioned problems or faults available at the moment.

Nokia C3-01 Mic Problem
Nokia C3-01 Mic Ways
Nokia C3-01 Mic Jumpers
Nokia C3-01 Mic Solution

Please Note that we will edit these solutions or add new ones if found in this page at any time in the future.
So feel free to come back any time on this page to stay up to date.

Nokia C3-01 Mic Problem Repair solution

Nokia C3-01 Mic Problem Repair solution

If you have further Questions please leave a comment.

Note: Please note that even though every solution posted on out website is tested by one or more members of our team before posting, but still we do not take any responsibility for any damage it may cause to your cell phones. Use these repairing solutions at your own risk. Thank You

Nokia C3-01 Keypad Problem Repair solution

Posted: 25 May 2012 07:36 AM PDT

This solution covers for hardware level of repair for Nokia C3-01 with a Keypad problem and Also you will find Nokia Nokia C3-01 Keypad Ways and Jumpers information in the diagrams further in this article.

Just see the solution preview below for it shows which components needs to be check and replace if the said Keypad of the Nokia C3-01 goes wrong.
This solution may help if you already done a software calibration method and tried replacing the Touch Screen but the problem continues.

Do these solutions step by step.

This solution may help for a water or wet damaged and accidentally, heavily dropped phones.
The Problem occur because of faulty TouchScreen Connector or bad it's connection to the Mobile Phone's PCBA Motherboard.
You Can Use any cleaning liquid for this purpose like CTC or any other you prefer.

Here is a list of all the solutions for the mentioned problems or faults available at the moment.

Nokia C3-01 Keypad Problem
Nokia C3-01 Keypad Ways
Nokia C3-01 Keypad Jumpers
Nokia C3-01 Keypad Solution

Please Note that we will edit these solutions or add new ones if found in this page at any time in the future.
So feel free to come back any time on this page to stay up to date.

If you have further Questions please leave a comment.

Note: Please note that even though every solution posted on out website is tested by one or more members of our team before posting, but still we do not take any responsibility for any damage it may cause to your cell phones. Use these repairing solutions at your own risk. Thank You

Nokia C3-01 Touch Screen Problem and Solution

Posted: 23 May 2012 07:37 AM PDT

This solution covers for hardware level of repair for Nokia C3-01 with a Touch screen display problem and Also you will find Nokia Nokia C3-01 Touch Screen Ways and Jumpers information in the diagrams further in this article.

Just see the solution preview below for it shows which components needs to be check and replace if the said Touch Screen of the Nokia C3-01  goes wrong.
This solution may help if you already done a software calibration method and tried replacing the Touch Screen but the problem continues.

Do these solutions step by step.

This solution may help for a water or wet damaged and accidentally, heavily dropped phones.
The Problem occur because of faulty TouchScreen Connector or bad it's connection to the Mobile Phone's PCBA Motherboard.
You Can Use any cleaning liquid for this purpose like CTC or any other you prefer.

Here is a list of all the solutions for the mentioned problems or faults available at the moment.

Nokia C3-01 Touch Screen Problem
Nokia C3-01 Touch Screen Ways
Nokia C3-01 Touch Screen Jumpers
Nokia C3-01 Touch Screen  Solution
Nokia C3-01 Touch Screen Jack Problem
Nokia C3-01 Touch Screen Jack Ways
Nokia C3-01 Touch Screen Jack Solution

Please Note that we will edit these solutions or add new ones if found in this page at any time in the future.
So feel free to come back any time on this page to stay up to date.

If you have further Questions please leave a comment.

Note: Please note that even though every solution posted on out website is tested by one or more members of our team before posting, but still we do not take any responsibility for any damage it may cause to your cell phones. Use these repairing solutions at your own risk. Thank You

Nokia Lumia 710 USB Problem and USB Ways Solution

Posted: 08 May 2012 08:03 PM PDT

Nokia Lumia 710 USB ProblemRepairing Solutions are available in the following article. Also you will find Nokia Lumia 710 USB Ways and Jumpers information in the diagrams further in this article. If your cell phone is having one of these faults check these diagrams out and do the solutions step by step.In Nokia Lumia 710 USB Problem can occur because of the faulty USB Connector or bad it's connection to the Cell Phone's PCBA Motherboard. Bad connections can happen or many reasons like if it's dropped or got wet, bad connection may also happen because of Carbon, Rust or even Dirt. So first of all you should clean Nokia Lumia 710 USB Connector Waysand PCBA Motherboard of the Mobile Phone.You Can Use any cleaning liquid for this purpose like CTC or any other you prefer. If you are certain that the bad connection is not the reason for your Mobile Phone's fault, then you can replace the USB Connector with a new one.

Here is a list of all the solutions for the mentioned problems or faults available at the moment. Please Note that we will edit these solutions or add new ones if found in this page at any time in the future. So feel free to come back any time on this page to stay up to date.

  • Lumia 710 USB Problem
  • Lumia 710 USB Connector Ways
  • Lumia 710 USB Connector Jumpers
  • Lumia 710 USB Solution
  • Lumia 710 USB Jack Problem
  • Lumia 710 USB Jack Ways
  • Lumia 710 USB Jack Solution

Please Note that we will edit these solutions or add new ones if found in this page at any time in the future. So feel free to come back any time on this page to stay up to date.

Here Are The Solutions. Please Observe Carefully. 
Nokia Lumia 710 USB Problem and USB Ways Solution

nokia lumia 710 USB Ways

Check our Previous Solution about Nokia Lumia 710

If you have further Questions please leave a comment.

Note: Please note that even though every solution posted on out website is tested by one or more members of our team before posting, but still we do not take any responsibility for any damage it may cause to your cell phones. Use these repairing solutions at your own risk. Thank You

Nokia Lumia 710 Display Problem Lcd Ways Solution

Posted: 08 May 2012 07:33 PM PDT

Nokia Lumia 710Display Problem Lcd Repairing Solutions are available in the following article. Also you will find Nokia Lumia 710 Display Solution Lcd Ways and Jumpers information in the diagrams further in this article. If your cell phone is having one of these faults check these diagrams out and do the solutions step by step.In Nokia Lumia 710 Display Problem Lcd can occur because of the faulty Lcd Connector, Display IC or it's bad connection to the Cell Phone's PCBA Motherboard. Bad connections can happen for many reasons like if it's dropped or got wet, bad connection may also happen because of Carbon, Rust or even Dirt. So first of all you should clean Nokia Lumia 710 Display Connector Lcd Ways Display IC and PCBA Motherboard of the Mobile Phone.

You Can Use any cleaning liquid for this purpose like CTC or any other you prefer. If you are certain that the bad connection is not the reason for your Mobile Phone's fault, then you can replace the Lcd Connector or Display IC with a new one.

You can also try to Re ball your Display or LCD IC. But please keep this in mind that this is not an easy process. It is a tricky method and if you do not have much experience in the Mobile Phones Repairing field you many damage your phone irreversibly, So it is not recommended. If you still want to do it here is rough guide on how to Re Ball an IC.

How To Reball IC Guide With Diagrams

If the problem still remains then you should continue with the following repairing solutions.

Here is a list of all the solutions for the mentioned problems or faults available at the moment. Please Note that we will edit these solutions or add new ones if found in this page at any time in the future. So feel free to come back any time on this page to stay up to date.

  • Nokia Lumia 710 Display Problem
  • Nokia Lumia 710 Lcd Connector Ways
  • Nokia Lumia 710 Lcd Connector Jumpers
  • Nokia Lumia 710 Display Solution
  • Nokia Lumia 710 Lcd Solution
  • Nokia Lumia 710 Lcd Problem
Here Are The Solutions. Please Observe Carefully. 
Nokia Lumia 710 Display Problem Lcd Ways Solution

nokia lumia 710 No Display Solution

Check our Previous Solution about Nokia Lumia 710

If you have further Questions please leave a comment.Note: Please note that even though every solution posted on out website is tested by one or more members of our team before posting, but still we do not take any responsibility for any damage it may cause to your cell phones. Use these repairing solutions at your own risk. Thank You

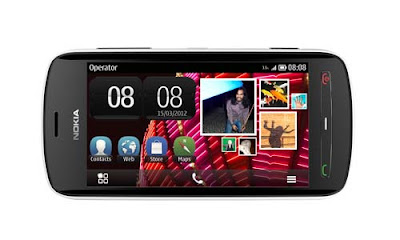
How to Disassembly Nokia 808 PureView

Posted: 08 May 2012 06:36 AM PDT

Nokia 808 PureView Disassembly

Nokia 808 PureView Disassembly

2.For Disassembling you need the Nokia Standard Toolkit and also need camera remoal toll SS-284 and an AV plug.

3. Protech The Touch display with Protective flim.

4.Use the opening notch to release the Batter Cover.

5. Remove the Battery Cover.

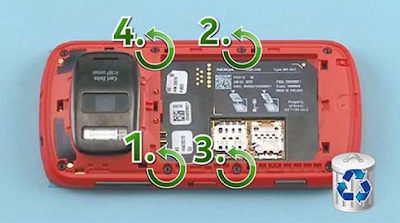
6. Unscrew the four TORX+ Size 6 Screws in the order shown. Do not use them again. Discard them.

7. Unscrew the four TORX+ Size 6Screws in the Order Shown.

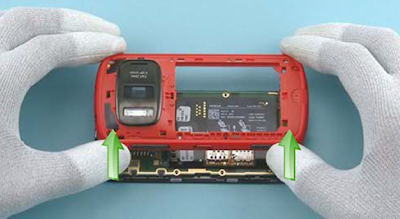
8. Lift the Body ASSEMBLY up.

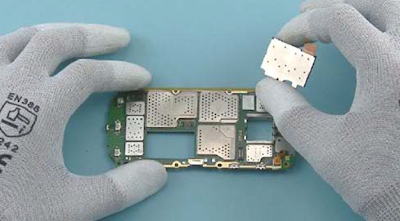
9. To remove the Engine Board, First release the Bottam end of the engine Board with the SS-93.

10. Turn the ENGINE Board carefully over.Becarefull not to damage the flexes.

11. Disconnect the Three Connectors CareFully with the SS-93. Becarefull not to Damage the connectors or any nearby components.

12. Lift up the ENGINE BOARD.

13. Remove the USB boot with fingers.

14. Use the SS-93 to Open the Camera connector.Be carefull not to damage the connector or any nearby components.

15. Place the camera removal tool SS-284 on bottm of the comera. while lifting the SS-284 up,push the Camera with a Finger through the Engine Board.

16. Remove the camera.

17. Use the SS-93 to Open The Card Connector. Becareful Not to Damage the Connector or any nearby Components.

18. Remove the Card Connector PWB with the Card Connector Spacer.

19. Separate the Card Connector Spacer from the Card Connector PWB. Do not use the Card Connector Spacer again. Discard it.

20. Disconnect the AV Connector with the SS-93.

21. Turn the Engine Board over and use the Tweezers to Remove the AV Connector. Do not use it again. Discard it.

22. Use an AV plug to Lever out the AV JACK.

23. Remove the AV JACK with the Tweezers.

24. Use the SS-93 to release the Flash Module.


25. Remove the Flash Module.

26. Release the IHF speaker with the SS-93.

27. Remove the IHF Speaker with Tweezers do Not use it again. Discard it.

28. Remove the Speaker GASKET with The Tweezers. Do not use it again. Make sure there is no adhesive or foam residue left in the speaker slot before placing the new IHF speaker.

29. Now the Nokia 808 PureView Disassembly Procedure is Complete.


Nokia 808 PureView disassembly is completed. To assembly Do 29 to 1 again..

If you have further Questions please leave a comment.

Note: Please note that even though every solution posted on out website is tested by one or more members of our team before posting, but still we do not take any responsibility for any damage it may cause to your cell phones. Use these repairing solutions at your own risk. Thank You

Sony Ericsson J20i Hazel Ringer Problem Buzzer Repairing Solutions

Posted: 05 May 2012 01:14 AM PDT

Sony Ericsson J20i Hazel Ringer Problem Buzzer Repairing Solutions are available in the following article. Also you will find Sony Ericsson J20i Ringer Ways and Jumpers information in the diagrams further in this article. If your cell phone is having one of these faults check these diagrams out and do the solutions step by step.

In Sony Ericsson J20i Buzzer Problem or Ringer problems can occur because of the faulty Buzzer or it's bad connection to the Cell Phone's PCBA Motherboard. Bad connections can happen for many reasons like if it's dropped or got wet, bad connection may also happen because of Carbon, Rust or even Dirt. So first of all you should clean Sony Ericsson Buzzer Ways and PCBA Motherboard of the Mobile Phone.

You Can Use any cleaning liquid for this purpose like CTC or any other you prefer. If you are certain that the bad connection is not the reason for your Mobile Phone's fault, then you can replace the Buzzer, Earpiece with a new one.

If the problem still remains then you should continue with the following repairing solutions.

Here is a list of all the solutions for the mentioned problems or faults available at the moment. Please Note that we will edit these solutions or add new ones if found in this page at any time in the future. So feel free to come back any time on this page to stay up to date.

  • J20i Ringer Problem
  • J20i Ringer Ways
  • J20i Ringer Jumpers
  • J20i Ringer Solution
Here Are The Solutions. Please Observe Carefully. 
J20i Ringer Ways Solution

J20i Ringer IC Location
J20i Ringer IC Direction

If you have further Questions please leave a comment.

Note: Please note that even though every solution posted on out website is tested by one or more members of our team before posting, but still we do not take any responsibility for any damage it may cause to your cell phones. Use these repairing solutions at your own risk. Thank You

How To IC reballing Full Guide with Images

Posted: 03 May 2012 11:30 PM PDT

Please keep this in mind that this is not an easy process. It is a tricky method and if you do not have much experience in the Mobile Phones Repairing field you many damage your phone irreversibly, So it is not recommended. If you still want to do it here is rough guide on how to Re Ball an IC.

If You are new to Mobile Phone Repairing please try to Reball IC with some Dead or Waste Board 2 or 3 times after that try with Working Board.

Video TutorialHow to Reball IC

 Reball IC Full Guide

If you have further Questions please don't hesitate to leave a comment.
Note:  we do not take any responsibility for any damage it may cause to your cell phones. Use these repairing solutions at your own risk. Thank You

Easy way to Identifying Your iPhone models

Posted: 02 May 2012 05:06 AM PDT

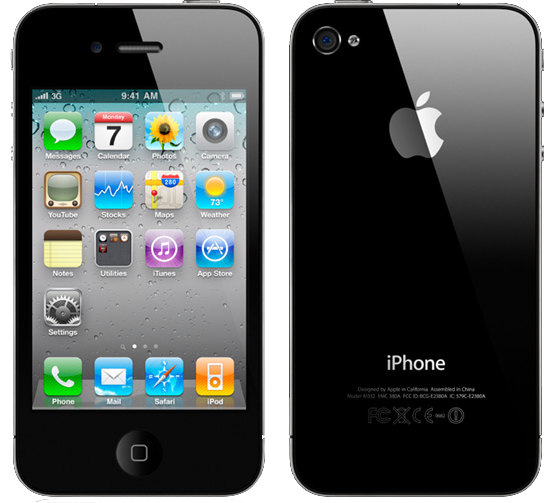
Identifying iPhone models

iPhone 4S 2011 A1387 16, 32, and 64 GB
iPhone 4S (GSM China) 2011 A1431 16, 32, and 64 GB
iPhone 4 (CDMA model) 2011 A1349 8, 16 and 32 GB
iPhone 4 (GSM model) 2010 A1332 8, 16 and 32 GB
iPhone 3GS front and back iPhone 3GS (China) 2009 A1325 8, 16 and 32 GB
iPhone 3GS front and back iPhone 3GS 2009 A1303 8, 16 and 32 GB
iPhone 3G front and back iPhone 3G (China) 2009 A1324 8 and 16 GB
iPhone 3G front and back iPhone 3G 2008 A1241 8 and 16 GB
iPhone front and back iPhone 2007 A1203 4, 8, and 16 GB
* You can find the model number on the iPhone’s back case.


Identifying features

iPhone 4S

  • The model number on the back cover is:
    A1431 on the iPhone 4S (GSM China)
    A1387 on the iPhone 4S
  • The front and back surfaces are flat and made of glass.
  • There is a stainless steel band around the edges.
  • The volume up and down buttons are marked with a “+” and “-” sign.
  • There is micro-SIM tray on the right side that holds a micro-SIM card.

iPhone 4

  • The model number on the back cover is:
    A1349 on the iPhone 4 (CDMA model)
    A1332 on the iPhone 4 (GSM model)
  • The front and back surfaces are flat and made of glass.
  • There is a stainless steel band around the edges.
  • The volume up and down buttons are marked with a “+” and “-” sign.
  • The GSM model has a micro-SIM tray on the right side that holds a micro-SIM card.
  • The CDMA model does not have a SIM tray.

iPhone 3GS

  • The model number on the back case is:
    A1325 on the iPhone 3GS (China)
    A1303 on the iPhone 3GS
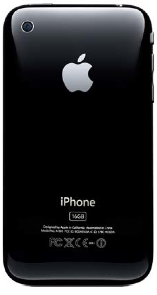
  • The back case is made of plastic.
  • The imprint on the back case is the same bright and shiny silver as the Apple logo.
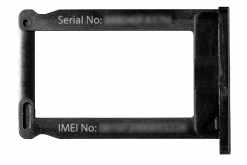
  • The serial number is printed on the SIM tray.
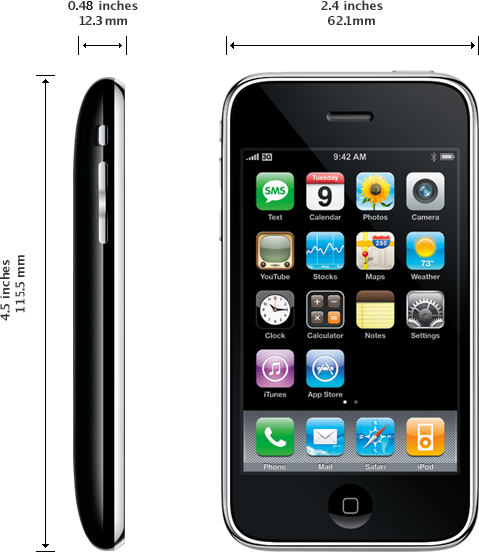
iPhone 3GS dimensions
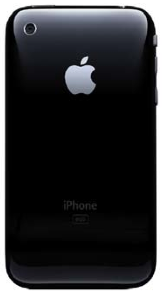
Back of iPhone 3GSiPhone 3GS SIM tray

iPhone 3G

  • The model number on the back case is:
    A1324 on the iPhone 3G (China)
    A1241 on the iPhone 3G
  • The back case is made of plastic.
  • The imprint on the back of the phone is less shiny than the Apple logo above it.
  • The serial number is printed on the SIM tray.
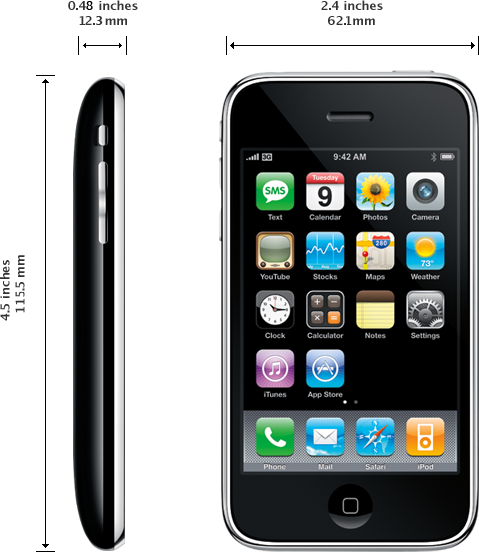
iPhone 3G dimensions
Back of iPhone 3GSiPhone 3G SIM tray

iPhone

  • The model number on the back case is A1203.
  • The back case is made of metal.
  • The serial number is etched in the back case.
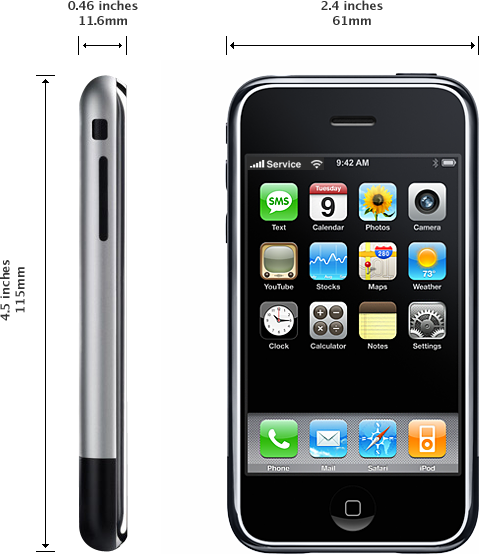
Original iPhone dimensions

Samsung C3222 Ringer Solution

Posted: 20 Apr 2012 05:16 AM PDT

This is the solution for Samsung C3222 Ringer (Buzzer) Hardware Failure problem. If the device doesn’t here Ringer sound, it doesn’t working, this solution may help fix if already done any firmware calibration but the problem still exists.


Just see the solution preview below for it shows which components needs to be check and replace if the said Ringer(Buzzer) of the Samsung C3222 goes wrong.


Hints to fix Samsung C3222 Ringer Failure:
1. If the Ringer(Buzzer) function doesn’t Works, Check the L313,L314 there must be a problem.
2. If the L313,L314  is okay, Check Ringer Ways. 
3. if the Ringer ways is ok, Change Ringer (Buzzer)

1.Ringer/Buzzer Ways
2.Change L313 & L314